Why Tubeless Sealant Fails In the First Place
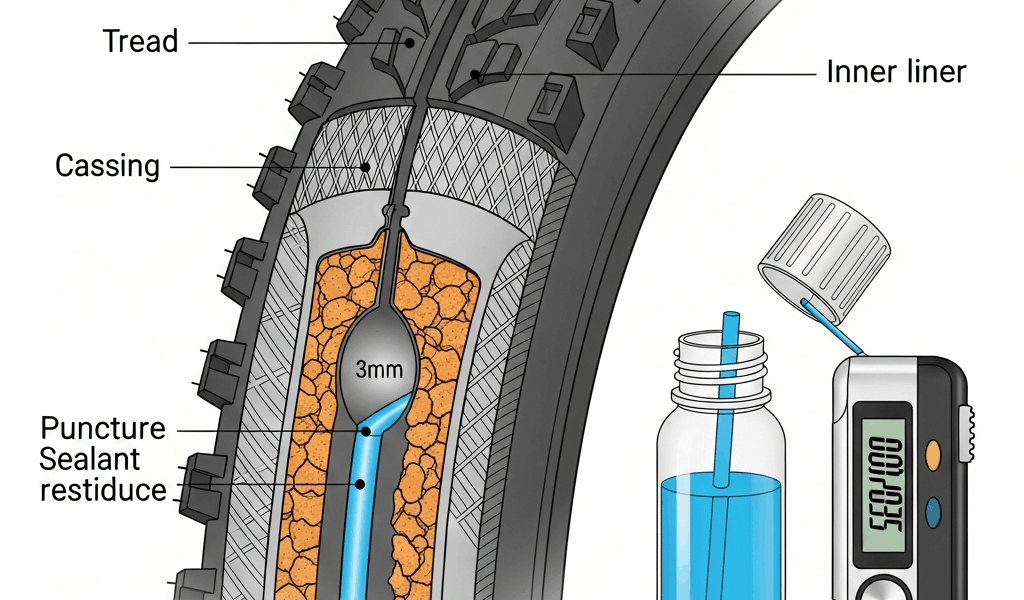
Tubeless sealant has grown more complex with the conflicting advice flying around. So let me tell you what’s actually happening inside your tire when the stuff works correctly: latex particles suspended in liquid flow toward the puncture, clump together around the damaged area, and dry into a rubbery plug. Elegant, really. Takes maybe five seconds when conditions are right.
Until it doesn’t work. And then you’re standing on a trail at 7am wondering why you own a bike.
As someone who has flatted in four different states across three different sealant brands, I dug into the practical details of why tubeless setups fail. Today, I will share it all with you. The short version: it usually comes down to one of four specific causes, and I’ve personally dealt with three of them on rides that were supposed to be easy.
- Your sealant has dried out or dropped below minimum volume
- The puncture is simply too large for sealant to handle
- Temperature is too cold for the latex to flow and seal quickly
- You’re using the wrong sealant formula for your conditions
Each one has a specific fix. None of them involve dumping more sealant in and hoping. Avoid the path I took.
Your Sealant Is Probably Dried Out or Too Low
This is the most common culprit. Also the easiest to miss — at least if you’re not checking regularly, which most riders aren’t.
But what is sealant lifespan, exactly? In essence, it’s the window before latex degrades enough to stop sealing reliably. But it’s much more than that. Warm, dry climates chew through sealant faster. Humid conditions buy you more time. The industry consensus sits somewhere between 2 and 6 months before performance drops off a cliff.
Here’s how to check without pulling the tire: remove your valve core with a valve tool — a $6 one from Amazon works fine — grab a spoke or a sealant dipstick, and insert it into the tire through the valve hole. Wait a few seconds. Pull it out. Thick, milky liquid coating the spoke means you’re good. Crusty, chalky, or barely there? You’ve found your problem. That’s it. Thirty seconds.
Worth saying out loud. Recommended volumes by tire size matter more than most riders realize. I learned this the hard way after running 60ml in a 45mm gravel tire and wondering why I was flatting every other ride.
- Road tires (25–32mm): 60ml per tire
- Gravel tires (40–50mm): 90ml per tire
- Mountain bike tires (2.3″+): 120–150ml per tire
Bigger tire volume means more surface to cover. When the wheel rotates, sealant pools in the lower half. Skimping on volume leaves dry patches — and dry patches are where flats happen.
Topping up mid-season? Add 30–50ml and rotate the wheel hard for about 30 seconds. If the sealant is older than four months or you’re pulling out chunks during the spoke test, strip the tire completely, scrub out the old residue with water and a rag, and start fresh. Takes 10 minutes. Beats standing roadside.
The Puncture Might Just Be Too Big to Seal
Sealant is not magical. It has hard limits, and most people — myself included, for an embarrassingly long time — don’t know what those limits are.
Latex-based sealants reliably seal punctures up to about 4–6mm in diameter. A typical thorn, small glass shard, or random road debris falls right in that range. Anything larger than 6mm — sidewall tears, gouges, snakebite-style damage — is outside what sealant can handle. Full stop.
Here’s how to evaluate what you’re dealing with on the side of the trail:
- Pinhole or fine puncture (under 2mm): Sealant seals in seconds
- Thorn-sized hole (2–4mm): Sealant seals in 10–30 seconds of rotation
- Gouge or wider puncture (4–6mm): Sealant may seal, but you’re at the edge — rotate aggressively and watch closely
- Sidewall tear or large cut (over 6mm): Sealant won’t hold; you need a plug or a tube
Sidewall tears are their own problem entirely. The sidewall is thinner and flexes constantly — sealant struggles to stick there even with small punctures. That’s what makes tire plugs endearing to us tubeless riders. They work where sealant can’t.
When you hit something that leaves a visible gash, stop rotating the wheel and look at it. If the cut is jagged or wider than a pen tip, a plug is faster and more reliable than waiting on sealant that isn’t coming. So, without further ado, let’s talk trail repairs.
Cold Weather Kills Sealant Performance
Latex thickens when cold. Below about 5°C (40°F), viscosity increases enough that sealant won’t flow fast enough to reach a puncture before air escapes. You spin the wheel. The sealant crawls. By the time it gets there, you’re already losing the pressure battle.
I learned this during a November gravel ride somewhere outside of Harrisburg, Pennsylvania. Maybe 6°C that morning — felt manageable. Hit a thorn through the front tire and watched the sealant just sit there. Moved like cold honey. That was 2021, and I still think about it.
Solutions depend on when you’re riding:
- Before a cold-weather ride: Store your bike indoors or in a heated garage for at least an hour before heading out. Warm sealant flows faster. This genuinely, measurably helps.
- Using standard latex sealant: Expect reduced performance below 40°F. Below freezing, switching formulas makes sense — not just in theory.
- Cold-weather formulas: Silca Super Secret and Orange Seal Endurance both maintain better flow in cold temps than standard mixes. I’m apparently a Silca convert now and it works for me while standard Orange Seal never quite did below 35°F.
This isn’t about chasing exotic products for every ride. Spring and fall? Standard sealant works fine. Winter riding? One bottle of cold-weather formula — around $22–$26 depending on size — is worth every cent.
What to Do When Sealant Won’t Fix It on the Trail
You’re on the trail. Tire went flat. Sealant didn’t seal it. Here’s the protocol that works — and in the order it should actually happen:
- Stop and locate the hole. Pinch the tire or listen for escaping air. Thirty seconds, maybe less.
- Rotate the tire so the hole sits at the bottom. Let sealant pool toward the puncture for 15–20 seconds.
- Spin the wheel slowly and watch for air bubbles forming over the hole. No bubbles after 30 seconds of slow rotation? Sealant isn’t holding.
- Install a tire plug. Roughen the hole with the plug kit’s tool, insert the rubber plug with adhesive, trim the excess flush. Two minutes, tops. The Dynaplug Micro Pro runs about $45 and fits in a jersey pocket.
- If the damage is sidewall or too large for a plug, boot it — gel wrapper, spare patch of tire casing, even a folded dollar bill wedged inside under the puncture. Then install a tube as a temporary fix and ride out carefully.
- Last resort only: tube, moderate inflation, nearest shop.
Thirty seconds of rotating without the sealant sealing is your signal to move on to the plug. Don’t keep spinning. You’re just losing air at that point.
One final thing — check your sealant levels before every ride season starts. Sixty seconds of prevention beats 20 minutes of roadside frustration every single time.


Stay in the loop
Get the latest pro bike tech updates delivered to your inbox.