Is It Actually the Headset Making That Noise
Bike creaks have evolved with all the conflicting advice flying around. As someone who spent three weekends chasing a single creak across every component on my bike, I figured out how to handle isolating headset noise the hard way. Today, I will share it all with you.
Here’s the fastest diagnostic I know. Stand over the bike, both feet planted on the ground. Grab the front brake hard — really squeeze it. Now rock the bike forward and backward using your body weight. No pedaling. Just push and pull. If the creak shows up during that test and only during that test, you’ve found your culprit. The headset is the connection point between the fork and frame, and it takes all that forward-and-back stress directly.
But what is a headset creak, exactly? In essence, it’s friction noise generated at the fork-to-frame interface under load. But it’s much more than that — because half the time what sounds like a headset is actually something else entirely. A seatpost creak appears when you climb out of the saddle. A bottom bracket creak syncs with your pedal stroke like a metronome. A stem creak usually shows up when you’re twisting the bars. The headset is unique. The noise emerges specifically when the fork rocks relative to the frame — not during steering, not during pedaling. That distinction matters.
One more confirmation test before moving on. Release the front brake. Drop the handlebars completely. Same push-pull motion. Creak disappeared? That’s a bearing noise, not a loose cup or a frame crack. Still there? The problem might live inside the headtube itself — a frame issue, and honestly beyond what this guide covers.
Once you’ve confirmed this is actually a headset problem, you can stop second-guessing yourself. So, without further ado, let’s dive in.
Check the Top Cap and Stem Bolts First
Here’s the part worth saying first. Before you touch the bearings, check the fasteners. A loose top cap bolt or stem bolts cause roughly 70% of the creaks I’ve run across — and fixing them takes about four minutes.
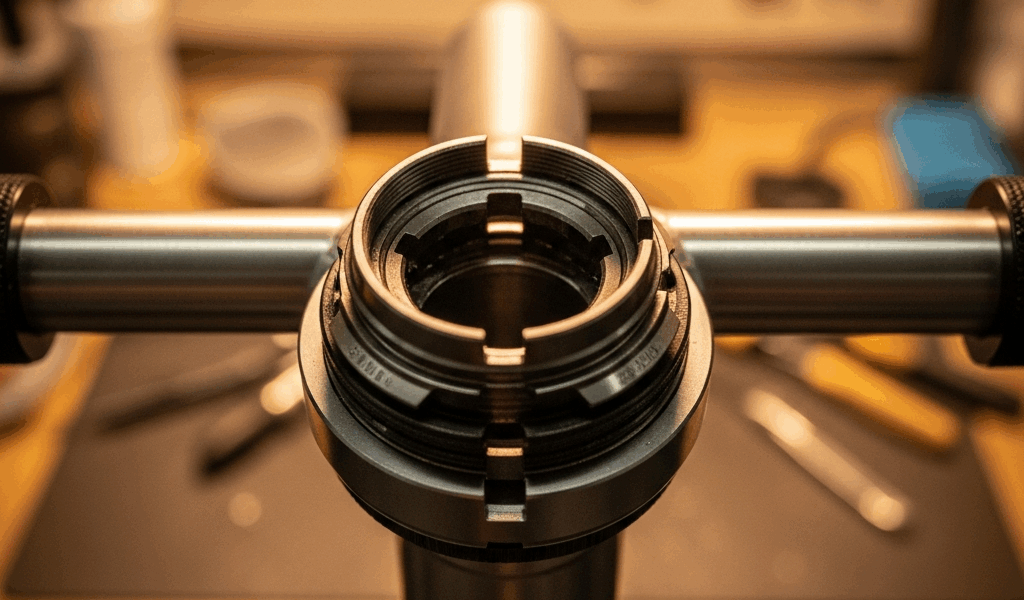
The top cap sits directly on top of the headset stack. Looks simple — just a bolt with a conical washer underneath. Its only job is to preload the bearings, compressing them just enough to eliminate play without crushing them. It does not clamp the fork to the frame. The stem bolts do that. This distinction matters more than most riders realize, because a lot of people crank the top cap down hard thinking it’ll solve everything. It won’t. It creates new problems instead.
Grab a 5mm hex key — or a Phillips if your bike’s older. Check the top cap bolt first. Snug, not gorilla-tight. Correct torque sits between 5 and 8 Newton-meters, which is roughly 44 to 71 inch-pounds. No torque wrench? Tighten until you feel light resistance, then stop. Skip the misstep I made of overtightening and wondering why the fork felt stiff for a whole season.
Now loosen the stem bolts slightly. Most stems run 5mm or 6mm bolts — usually four of them, two on top, two clamping the steerer tube. Loosen about half a turn each. Don’t remove them. Re-tighten the top cap to preload the bearings properly, then retighten the stem bolts in a cross pattern: top-left, bottom-right, top-right, bottom-left. Each bolt torqued to 4 to 6 Newton-meters. That sequence prevents uneven clamping, which itself causes creaks.
Test immediately. Lock the brake and rock the bike. Creak gone? You’re done. Still there? Keep reading.
Inspect the Headset Bearings for Wear or Contamination
A worn or dirty bearing is the second most common culprit. You’ll need to pull the stem and fork to see what’s actually happening inside — while you won’t need specialized shop tools for inspection, you will need a handful of basic items: a hex key set, a clean rag, and decent lighting.
Loosen the stem bolts completely and slide the stem off the steerer tube. Should come free without much force. Remove the top cap bolt. Now lift the fork straight out of the frame.
Look at the bottom of the fork crown. There’s a small ring sitting there — that’s the crown race. Should be smooth and shiny. Spin it gently with your finger. A healthy crown race rotates freely with zero grinding. A worn one feels gritty, maybe rough in spots. Visible pitting means it’s genuinely done.
Now check the bearing cartridges or loose balls themselves. Discoloration, corrosion, white crusty deposits — that last one is water contamination, and it’s common. Bearing balls should look smooth and silvery. Pitting or rust speckling means replacement, not cleaning.
I’m apparently a heavy wet-weather rider and integrated headsets — the kind where bearings live in sealed cartridges — never work well for me while traditional cup-and-cone setups hold up longer in rain. My 2015 Trek Domane developed a creaking headset within two seasons. I wasn’t regreasing often enough, maybe once every eight months. The water got in anyway. Don’t do what I did.
If the bearings look clean and spin smoothly by hand, grease them and reassemble. If there’s visible damage, replacement is the only real fix. That’s what makes proper inspection endearing to us home mechanics — it tells you exactly where to spend money and where you don’t need to.
Regrease the Bearing Surfaces and Headtube Contact Points
Dry bearings creak. Even brand-new ones.
Start with the crown race. Remove it if possible — some are press-fit, so don’t force it if it’s not coming. Apply a thin layer of waterproof or marine grease directly to the race surface. Phil Wood Tenacious Grease is probably the best option, as headset maintenance requires something that won’t wash out in rain or humidity. That is because headtubes collect water from the top, and lighter greases evaporate or get displaced within a few months. Finish Line Teflon Grease works too, costs around $9 for a tube that’ll last years. Spread evenly with your finger — a coating, not a glob.
Next, the bearing cartridges or loose balls. Cartridge bearings need a small amount of grease worked into the contact surfaces where they rest in the cups. Loose ball bearings need grease applied to the races — the curved surfaces inside the headtube where the balls actually roll. Thin coat, even distribution.
First, you should also grease the steerer tube where it enters the stem — at least if you want to eliminate every possible creak source in one shot. Those clamping surfaces move slightly under load. A creaking stem-to-steerer interface mimics a headset creak almost perfectly, and greasing there costs nothing extra.
Skip the dry lube. Skip the chain lube. Dry lubricant evaporates outdoors and offers no water resistance. Chain lube is too light — washes out in a single wet ride. Waterproof grease stays put. That was 1996 advice that still holds.
Reassemble Correctly and Test Before Riding
Order matters here more than anywhere else in this process.
Install the fork back into the frame. Set the crown race in place — light pressure if needed. Slide the stem onto the steerer tube and leave the bolts loose. Install the top cap bolt and snug it down until preload is set. You should feel zero play when you gently wiggle the fork side to side, but the fork should still rotate smoothly without any stiffness. Spin it gently. No clicking when you rock it, moves freely side to side — you’re in the right zone.
This is honestly the trickiest part of the whole job. The window between “no play” and “too tight” is narrow. Go slow. Add small increments of torque and check between each one.
Now torque the stem bolts in the cross pattern: 4 to 6 Newton-meters each. Tighten slowly, check your work between bolts, and don’t rush the last two.
Test before you ride. Lock the front brake. Stand over the bike. Push hard. Rock forward and back. Zero creak means success — go enjoy the ride. Still creaking? The problem is either a damaged bearing that needs replacement or a loose cup pressed into the frame. Both of those jobs need a bearing press or a shop visit. No shame in that. Some problems just need the right tool.

Stay in the loop
Get the latest pro bike tech updates delivered to your inbox.