Why Your Front Derailleur Won’t Reach the Big Ring
Front derailleur problems have become tricky with all the conflicting advice flying around. You’re mid-ride, you push the lever, and the cage just… sits there. Chain stays on the middle ring while your legs are spinning out completely.
As someone who’s wrenched on bikes for years, I got hands-on with front derailleur failures the hard way. Today, I will share it all with you.
My personal low point: forty minutes of diagnosing what turned out to be a single quarter-turn of the barrel adjuster. Skip the misstep I made. The culprit almost always lives in one of three spots — cable tension has gone slack, the H limit screw is too tight, or the cage has rotated out of parallel with your chainrings.
Before touching anything, just look. Compressed or kinked cable housing? Does the lever feel snappy or mushy when you pull it? Is the cage visibly cocked at an angle? These checks take maybe thirty seconds and usually point straight at the real issue.
Check Cable Tension First — It’s Usually This
Cable stretch accounts for probably 60 percent of failed big-ring shifts. The cable settles into the housing over weeks of riding. Tension that felt dialed in around week two can feel like almost nothing by month four.
Start by shifting to the small ring. Derailleur all the way inward. Now look at where the cable exits the shifter — any visible slack? Grab the bare cable and try moving it up and down. It should resist you. If it wiggles an eighth of an inch without much effort at all, that’s your problem right there.
The fix is simple. Most derailleurs have a barrel adjuster — a small cylindrical dial, usually right where cable meets derailleur body. On Shimano components, it’s clearly marked. SRAM systems have them too, though they run smaller and easier to miss, honestly.
Turn the barrel adjuster counterclockwise in quarter-turn increments. Not full rotations. Quarter turns. After each one, try shifting toward the big ring and feel what the cage does. You’re waiting for that specific moment where the cage snaps outward with confidence instead of just creeping reluctantly.
Correct tension feels like this: immediate lever response, zero dead zone at the start of the stroke. The cage moves decisively when you shift up — but not so aggressively it overshoots and tosses the chain. That’s the sweet spot.
If the barrel adjuster is completely dialed out and the cable still feels slack, you’ve hit the physical limit of that adjuster. At that point, you manually re-tension at the derailleur clamp bolt — loosen it, pull the cable taut with a 5mm hex wrench, re-tighten. Less elegant. Works fine.
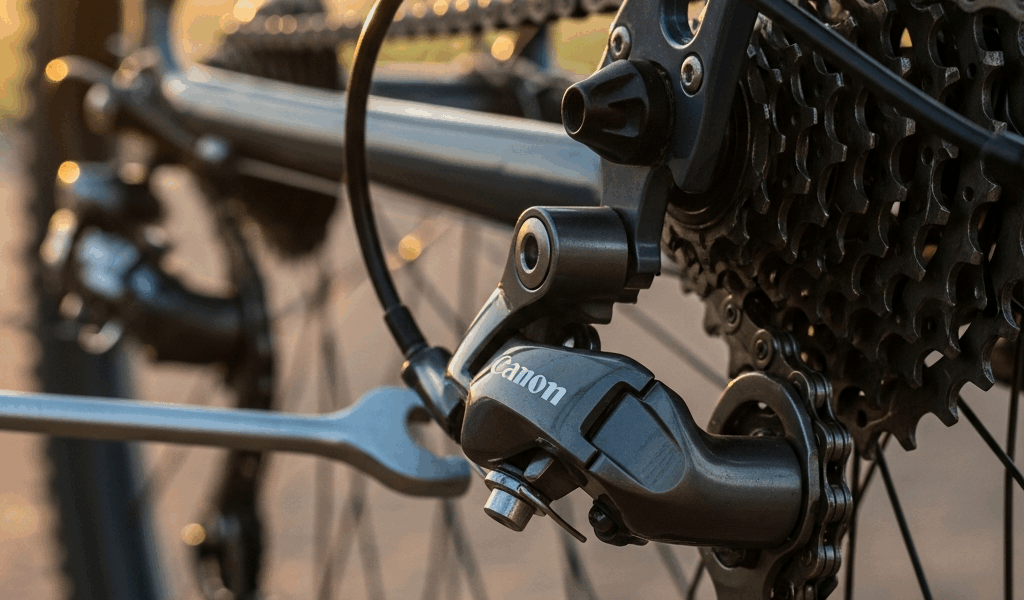
How to Adjust the High Limit Screw
But what is the H limit screw? In essence, it’s the physical stop that controls how far outward the cage can actually travel. But it’s much more than that — it’s also the most commonly confused adjustment on the whole derailleur.
Tighten it clockwise and you prevent the cage from reaching the big ring. Loosen it counterclockwise and you allow more outward travel. The target is roughly 1 to 2 millimeters between the outer cage plate and the chain when everything is sitting on the biggest chainring.
Finding the H screw: look at the derailleur body from behind the bike. Two screws visible. The lower one is L — the low limit. The higher one is H. Some derailleurs label them. Others don’t bother.
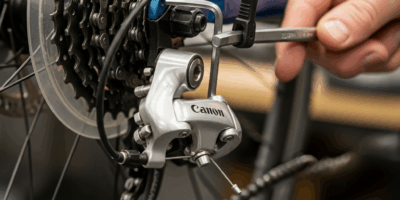
Fix the cable tension first, then try this. Shift all the way up and physically push the cage outward with your hand. Won’t move at all? H screw is too tight. Chain shifting onto the big ring but immediately falling off the outside? You’ve gone too far counterclockwise.
For the actual adjustment, grab a 3mm hex wrench — that’s standard on most modern road and gravel derailleurs. Loosen in half-turn increments. Shift after each one. You want the cage to stop naturally when the chain seats cleanly on the big ring, not jam against an invisible wall.
Once that chain is sitting on the big ring cleanly — stop. A 1mm gap is your baseline. Go past 2mm and you’re asking for chain drop on rough descents or during hard punchy accelerations.
Check Derailleur Height and Rotation Angle
The cage needs to run parallel to your chainrings. Not tilted forward. Not angled backward. Parallel. A rotated cage hits the chain at a bad angle and physically cannot push it outward the full distance.
Look at the derailleur straight from behind the bike. The outer cage plate should line up flush with the plane of the chainrings. If the top of the cage is pointing toward your dropout while the bottom kicks toward the frame — that’s wrong and it won’t shift no matter what else you adjust.
To correct the rotation, loosen the clamp bolt on the seat tube — maybe a half-turn, just enough that the derailleur body can rotate. Don’t pull the bolt out. Rotate the whole unit until the cage runs parallel, then tighten back down.
Height is secondary but still worth a look. The outer cage plate should hover 1 to 3 millimeters above the big ring teeth. Too high and the cage can’t properly engage the chain. Too low and you get constant rubbing on every pedal stroke.
To adjust height, loosen the clamp bolt further and slide the derailleur up or down the seat tube before re-tightening. Most clamps have enough range to handle small corrections without needing to fully remove and re-route the cable.
When You Still Can’t Get It to Shift — What Comes Next
Worth putting near the top. Not every problem lives in cable tension and limit screws.
Inspect the cage visually. Bent metal won’t shift right regardless of how perfect your adjustments are. If the outer plate looks kinked or the cage looks asymmetrical from any angle, you need a replacement. A Shimano Tiagra FD-R4700 front derailleur runs around $40 to $55 online. A SRAM Apex unit lands closer to $80 to $100 — but both beat paying shop labor rates for diagnosis, parts ordering, and installation.
Check the cable itself. Frayed strands, corroded housing, or a cable that’s partially separated from its sheath won’t hold tension after adjustment. Replacement cables run $8 to $12. Housing is roughly the same. Both are worth swapping if anything looks even slightly compromised — I’m apparently someone who always waits too long on this and SRAM cables work fine for me while cheap generic housing never lasts through a full season.
Component mismatch trips people up constantly. A road shifter paired with a mountain derailleur runs different cable pull ratios. They won’t cooperate. Verify your shifter and derailleur are matched by brand and intended drivetrain generation.
If you’ve run through every step above and that derailleur still refuses the big ring, a shop visit is genuinely justified. Bent derailleur hanger, internal cable fraying inside the housing, or a worn shifter ratchet mechanism — those require professional eyes and tools.
Quick Checklist
- Test cable tension by hand and through the shift lever feel
- Adjust barrel adjuster in quarter-turn counterclockwise increments until cage snaps outward decisively
- Loosen the H limit screw counterclockwise until the cage reaches the big ring cleanly
- Confirm derailleur cage runs parallel to chainrings — rotate at clamp if needed
- Verify 1–3mm gap between outer cage plate and big ring teeth
- Inspect for bent cage, worn or frayed cable, or component mismatch
- Replace cable, housing, or derailleur if any visible damage is present


Stay in the loop
Get the latest pro bike tech updates delivered to your inbox.