Why the Bead Won’t Seat in the First Place
Tubeless tire setup has become harder to navigate with all the conflicting advice flying around. Buy this sealant. Use that tape. Get a $200 compressor. Meanwhile, the actual problem is usually something embarrassingly simple — and you’ve already got the fix sitting in your garage.
As someone who’s spent way too many evenings kneeling on cold concrete fighting stubborn beads, I sat down and learned why tubeless tires refuse to seat. Today, I will share it all with you.
There are three failure modes, roughly in order of how often they actually happen. Rim tape that’s compromised — either it never adhered properly or it’s bubbled over a spoke hole somewhere. A bead that isn’t centered in the channel before inflation starts, meaning you’re fighting physics from stroke one. Or you’re just not delivering enough air volume fast enough to outpace the leak around the unseated bead. Most people immediately reach for a new compressor when the real culprit is a 50-cent piece of tape.
So, without further ado, let’s dive in. But first: grab a light. Look first. Inflate second. That diagnostic habit alone will save you hours.
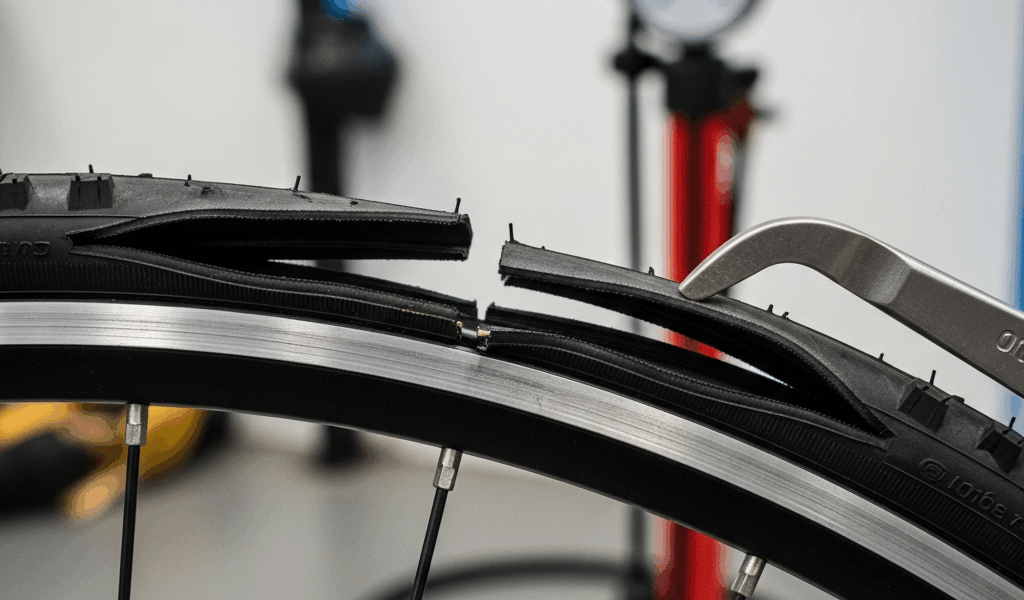
Check the Rim Tape Before Anything Else
Worth mentioning before anything else. I burned an entire evening pumping away at a Specialized Roubaix with a basic floor pump before finally grabbing a flashlight and spotting a creased section of tape on my DT Swiss 370 — sitting right over a spoke hole. That was maybe 11 p.m. on a Tuesday. Not my finest moment.
But what is rim tape, really? In essence, it’s a barrier covering the spoke holes so sealant doesn’t pour through them and air doesn’t escape around them. But it’s much more than that. It’s the foundation the entire tubeless system is built on. If the tape doesn’t seal, nothing downstream matters. You can hit perfect pressure for three seconds and then watch it disappear.
What Good Tape Actually Looks Like
Start with width. Your rim has an inner width — usually stamped right on the sidewall or listed on the manufacturer’s page. Schwalbe, Mavic, and DT Swiss all publish this number. Your tape should overlap the inner width by at least 2mm on each side. Running a 17mm inner-width rim? 21mm tape is the bare minimum. 25mm is safer. Skip past the mistake I made of buying whatever width was on sale.
Next, look at the spoke holes. Tape needs to bridge them completely — no bubbles, no micro-gaps. This is where most home setups fall apart. You’re pressing tape over a surface that isn’t flat, and tape doesn’t naturally want to conform to holes punched through curved aluminum.
Here’s a check you can do without stripping the whole wheel. Mix dish soap and water in a spray bottle, nothing fancy. Spray along the valve stem area, then run a line across each spoke hole. Inflate to around 20 psi — just enough to pressurize the system. Bubbles forming anywhere mean air is escaping there. Mark those spots with a grease pencil or tape flag.
The valve stem area deserves its own inspection. Tape needs to wrap fully around the valve hole with zero gaps. Tape that terminates exactly at the valve edge — without overlap — will leak sealant around the base every time. I’ve seen premade valve strips fail on wider rims because the recess was deeper than the strip was designed for.
How to Fix Tape Issues Without Starting Over
Isolated bubbles over one or two spoke holes? You can patch without a full restrip. Deflate completely. Cut a roughly 2-inch square of fresh rim tape. Clean the existing surface with isopropyl alcohol — 70% works fine, 91% is better. Press the patch over the bubble firmly for a solid 30 seconds. Re-inflate slowly, re-spray, re-check.
Creasing or bubbling across a bigger section means the tape is done. Use a heat gun — or a hair dryer on high for about 20 seconds — to soften the adhesive, then peel slowly from one end. Clean the rim bed thoroughly with isopropyl and let it dry completely. When you reapply, roll new tape on in sections, pressing hard as you go. A dedicated rim tape roller is ideal. The edge of a credit card works in a pinch. The goal is zero air pockets under the tape before a single spoke hole is covered.
How to Get Enough Air Volume Fast Enough
Assuming tape is solid, the physics here are pretty simple. The bead snaps outward into the rim channel when pressure spikes faster than air can escape around the unseated edge. A standard floor pump is too slow. A compressor is built for exactly this.
But before you spend $150, try the valve core trick. Remove the valve core entirely using a dedicated valve core tool — they run about $8, and you should honestly already own one. Removing the core opens a larger airflow path. Now pump fast. Aggressively fast. Thirty full strokes in rapid succession, no pausing. You’re trying to create a sharp pressure spike that slams the bead outward in one motion.
Does it always work? No. It works well on wider rims and tires with supple, flexible beads. It struggles on narrow road rims where the channel is tighter and the margin for error is smaller. If you hear a pop — sometimes two, one per side — and the tire suddenly firms up dramatically, you’ve won. Reinstall the valve core immediately and top off the pressure.
If the pump trick fails twice, move on. A tubeless inflator like the Specialized Air Tool Pro — around $60 to $80 — delivers a burst of high-volume air that mimics what a compressor does. A small tank compressor from DeVilbiss or a similar brand, usually $120 to $200, delivers sustained pressure. Both get the job done. The inflator is more portable. The compressor is more versatile long-term.
Still struggling? Spray soapy water around the full tire-to-rim interface. Bubbles will pinpoint exactly where air is escaping. That spot is your next problem to solve.
When the Bead Seats But Then Won’t Hold Pressure
The bead pops in. You hear it — that satisfying thwack. You feel the tire firm up. Then five minutes later you’re back down to 60 psi and the sidewall has gone noticeably soft. That’s what makes sealant so critical to us tubeless riders. It’s not optional finishing gloss. It’s structural.
Sealant is a latex suspension with rubber particles that fills the micro-gaps between the bead and rim. Two ounces per tire is the standard starting point for road setups. Mountain bike tires need more — 3 to 4 ounces, depending on volume. Orange Seal, Stans No-Tubes, Muc-Off — they all perform similarly at this stage. I’m apparently a Stans person and it works for me while Orange Seal never quite sealed one particular Hunt rim I was running. Your results will vary.
Here’s the part that gets skipped in most tutorials. After adding sealant, you have to actively move the tire to coat the full bead circumference. Don’t just inflate and lean the wheel against a wall. Flip the wheel, spin it, tilt it forward and backward. Work the sealant around the entire inside surface for three to five solid minutes. It needs to reach every micro-gap where the bead contacts the rim hook.
Then wait. Pressure will drop slightly as sealant redistributes and cures — that’s normal. Check at one hour. Check again at four. Check at 24. Some tire-and-rim combos need a full day. Continental Grand Prix TTs are notorious for slow seating. Kenda and Schwalbe tires tend to cooperate faster. If pressure is still dropping after 24 hours, add another two ounces of sealant, rotate again, and give it 12 more hours.
When to Give Up and Go Back to a Tube
Not every rim and tire combination is actually tubeless-compatible — regardless of what the marketing says. I’ve had off-the-record conversations with engineers at two tire companies who will openly admit that certain pairings simply don’t work, no matter how dialed your setup process is.
Watch for these red flags. A bead that looks visibly stretched, cracked, or deformed when you pull the tire off. A rim edge that’s sharp, dented, or uneven rather than smooth and consistent. A tire that’s been installed and removed from a tubeless setup multiple times — the bead fatigues and loses the elasticity it needs to snap and hold.
Also think about dimensional compatibility. Narrow rims under 17mm inner width paired with tires designed for 25mm or wider will fight you. The bead geometry won’t match the channel geometry. That’s a physics problem, not a technique problem.
While you won’t need to exhaust every trick in the book, you will need to have genuinely worked through all of the above before calling it. If the tape is clean, you’ve used a compressor or inflator, you’ve waited the full 24 hours, you’ve added fresh sealant twice — and the tire still won’t hold 60 psi? Stop. Buy a quality tube, install it, and ride. This is not failure. This is knowing your equipment’s limits. And honestly, a tube setup that works beats a tubeless setup that doesn’t every single time.


Stay in the loop
Get the latest pro bike tech updates delivered to your inbox.