Why Your Lever Is Still Spongy After a Bleed
Hydraulic brake bleeding has gotten complicated with all the conflicting advice flying around. You followed every step. You watched the tutorial twice. You flushed clean fluid through the whole system — and the lever still feels like squeezing a stress ball. That’s a special kind of frustration, honestly, because you already put in the work.
As someone who’s bled probably thirty sets of brakes across five different brands, I learned everything there is to know about why this keeps happening. Today, I will share it all with you.
Three culprits show up constantly. Air is still hiding somewhere the bleed didn’t reach — usually at the caliper ports. Your lever was angled wrong during the bleed, which trapped air inside the master cylinder itself. Or — and this one surprises people — the master cylinder piston or seal is just worn out. No bleed in the world fixes that last one. So, without further ado, let’s dive in.
Check Lever Position First — This Gets Missed Constantly
Probably should have opened with this section, honestly. Lever position during bleeding controls whether air can actually escape the master cylinder dome. It’s the most skipped variable in every guide I’ve ever read — including the good ones.
Different brands want different angles. Shimano brakes — XT, SLX, Saint — want the lever parallel to the ground or angled slightly upward. SRAM Guide and Code brakes prefer the lever pointed almost downward, toward your body. Magura sits somewhere in the middle. The reason isn’t arbitrary: gravity has to push air out toward the bleed port. Get the angle wrong and air parks itself directly behind the piston instead.
Wrong angle during bleeding means trapped air you can’t pump out. The lever feels mushy. You pump it twenty times. Still mushy. That’s why.
Here’s the fix. Loosen your brake lever from the bars just enough to rotate it — no need to fully remove it. Dial it to the angle your specific brake model calls for. Grab a 2.5mm hex key — or whatever your bleed port accepts — and crack the port at the lever about a quarter turn. Don’t go further than that. Pull the lever slowly. Fluid should dribble out. Air bubbles coming with it? Keep going until only clean fluid flows. Close the port. Rotate the lever back. Tighten it down. Test the feel immediately.
This single fix resolves roughly 40% of post-bleed sponginess cases. I’m apparently a slow learner, and redoing an entire bleed on a pair of Codes works for me as a lesson while skipping the manual never does. Don’t make my mistake.
How to Purge Air Trapped at the Caliper
But what is caliper-trapped air? In essence, it’s air hiding in the small passages between the piston and bleed fitting — places standard gravity bleeding doesn’t reach. But it’s much more than just inconvenient. It’s the reason your lever stays spongy even after a textbook bleed.
Start by tapping the caliper firmly with a small rubber mallet — or the handle of a flathead screwdriver if that’s what’s nearby. Tap all around the piston area and bleed port housing for about 30 seconds. Rotate the caliper slightly as you go. Vibration dislodges tiny bubbles clinging to corner pockets and nudges them toward the bleed port where they can actually escape.
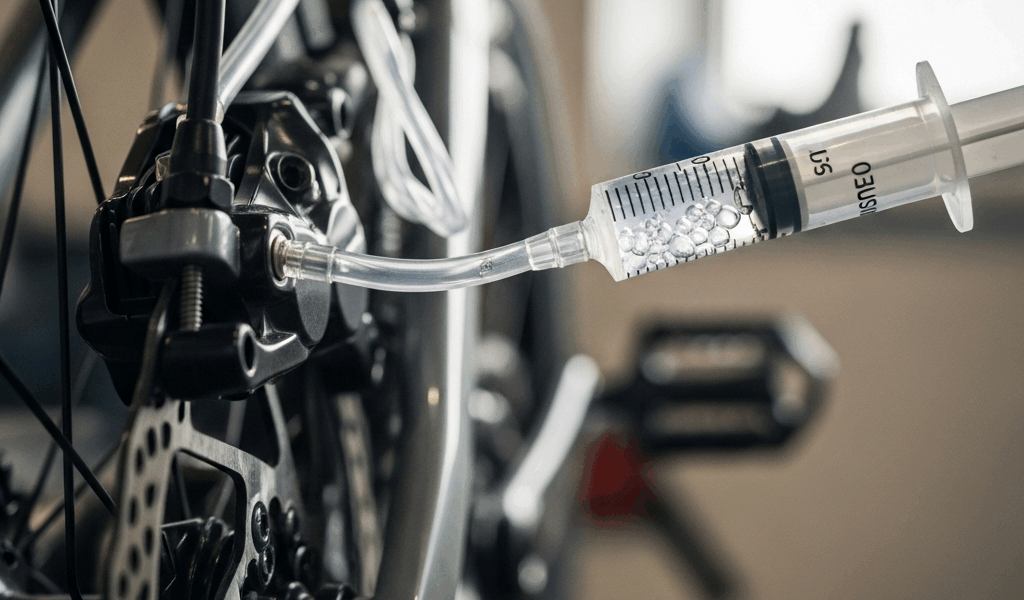
Next, loosen the bleed port a half turn. Not all the way — just open. Fill a syringe with your brake fluid. Mineral oil for Shimano and Magura. DOT fluid for SRAM and Avid. Push the syringe tip into the open port and inject slowly. Watch carefully. Foam, distinct bubbles, or both will start appearing. Keep pushing. Use around 20ml total. Close the port once only clean, bubble-free fluid comes out.
Then bleed from the lever side normally. That two-direction approach forces stubborn air toward the path of least resistance instead of letting it sit in place indefinitely.
Know your hardware before you start. On Shimano XT brakes, the caliper bleed port faces upward on the top of the caliper body. SRAM Guide calipers have the port on the back side near the piston assembly. Damage a bleed port and you’re shopping for a replacement caliper — anywhere from $120 to $200 depending on the model. Worth taking ten seconds to identify the port correctly.
When the Problem Is the Master Cylinder, Not the Air
Here’s the part that usually surprises people. Sometimes a spongy lever after bleeding has nothing to do with air. It’s a seal or piston failure inside the master cylinder — and that distinction matters enormously.
The sign is specific. The lever feels decent immediately after bleeding. Then, over roughly 30 seconds of sustained pressure — not pumping, just holding — it slowly inches toward the bar on its own. That’s not air moving. That’s a piston seal leaking internally, or a scored piston from debris that got into the system somewhere along the way.
A worn seal lets fluid seep past the piston instead of building pressure. No fluid loss externally. No visible leaks. Just zero pressure buildup. That’s what makes spongy lever diagnosis so confusing — the system looks fine. It isn’t.
Rebuilding a master cylinder means buying a rebuild kit — around $25 to $50 for Shimano or SRAM premium brake lines — and spending about 20 minutes disassembling the piston, cleaning everything, and reassembling. Cheaper brake models sometimes skip offering rebuild kits entirely, which means buying the full lever assembly. That runs $80 to $180 depending on the brake. Budget options are rarely actually budget options once something breaks.
Quick test for this: bleed the brake fully, get a firm lever, then clamp it pressed with a C-clamp or zip tie for five full minutes. Release it. Lever moved? Feels softer than when you clamped it? That’s master cylinder failure. Rebuild or replace — bleeding again won’t change anything.
Final Lever Feel Test and When to Seek a Shop
Before calling it solved, run a real test. Apply moderate pressure. A properly bled lever engages somewhere in the first third of travel and feels solid — firm, progressive resistance with a clear engagement point. Not a hard sudden stop. Not mushiness. Something in between those two extremes.
Squeeze harder. The lever shouldn’t move any further. Travel remaining after hard braking means air is still in the system or something else is still wrong. That’s what makes this test worth doing — it tells you exactly what category of problem remains.
Hold steady pressure for 15 seconds. Lever creeps back toward the bar? Master cylinder issue. Holds completely still? You’re done. That’s the whole diagnostic in two questions.
While you won’t need a full professional teardown every time, you will need a handful of honest attempts before defaulting to a shop bleed. First, you should try lever angle correction and caliper purging — at least if you haven’t done both specifically and intentionally. A shop bleed might be the best option, as hydraulic diagnosis requires hands-on feel. That is because a good tech identifies the difference between air, seal failure, and contaminated fluid in about 30 seconds flat. Shop bleed costs $40 to $80. That’s worth it after three failed attempts at home. Knowing whether you need a $30 rebuild kit or a $150 lever is worth even more.

Stay in the loop
Get the latest pro bike tech updates delivered to your inbox.