
Why Your Cassette Is Stuck in the First Place
Cassette removal has become tricky with all the conflicting advice flying around. As someone who has destroyed a perfectly good freehub trying to muscle off a stuck cassette, I picked up the practical knowledge of this particular nightmare. Today, I will share it all with you.
But what is a stuck cassette, really? In essence, it’s a cassette that has bonded to the freehub body through one of three distinct mechanisms. But it’s much more than that — and misdiagnosing which one you’re dealing with is where most people go wrong.
First, seized locknut threads. Moisture works into the microscopic gap between the lockring and freehub, rust forms, metal bonds to metal. Happens fast if you ride anywhere wet or salty. Second, alloy-on-alloy galvanic corrosion. Brutal one, this. A steel cassette sitting on an aluminum freehub causes electrons to migrate between the two metals — the aluminum corrodes, the cassette fuses. Third, a rounded or damaged locknut spline. Someone already tried removing it wrong. Maybe with a flathead screwdriver. Maybe without penetrating oil. Maybe both.
Seized threads feel like solid, immediate resistance the moment you apply torque. Galvanic corrosion feels different — the locknut breaks free fine, but the cassette itself refuses to slide off the body. A rounded spline means the lockring tool just spins uselessly no matter how hard you push into it. Know which fight you’re in before you start swinging.
Tools You Need Before You Start
While you won’t need a full workshop setup, you will need a handful of specific tools — and the right ones, not approximate substitutes. Don’t improvise here. I learned this the hard way after destroying a $120 SRAM XD freehub trying to lever a cassette off with a flathead. Don’t repeat what I did.
- A chain whip — Shimano, SRAM, doesn’t really matter, they’re universal across most setups
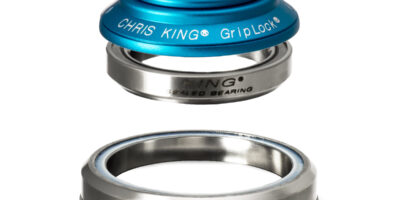
- The correct cassette lockring tool for your specific drivetrain (Shimano HG uses one design, SRAM XD uses another entirely, Campagnolo uses a third — grab the wrong one and you’ll round the splines before you know what happened)
- A large adjustable wrench or, better still, a bench vise
- Penetrating oil — Finish Line Penetrating Oil or WD-40 Specialist, nothing thinner or weaker
- A rubber mallet if you’re going the vise route
- A clean rag and some old newspaper for the mess
The lockring tool might be the best place to spend your attention here, as cassette removal requires an exact spline match. That is because the wrong tool — say, a Shimano HG tool on an SRAM XD cassette — rounds the splines instantly, permanently, on the very first attempt. Check your groupset before you buy anything. One tool does not fit all, despite what the shop clerk might cheerfully tell you.
Step by Step How to Remove a Stuck Cassette
Step 1: Remove the wheel and quick release. You need the cassette isolated and stable. Set the wheel flat on a clean surface — old newspaper works fine here.
Step 2: Soak the locknut. This is where most guides fail you. They say spray penetrating oil, then immediately start wrenching. Wrong. Spray the locknut threads generously — get it into every gap you can see. Then wait. Minimum 10 minutes. Ideally 30. I’ve personally seen seized locknuts break free only after sitting for a full hour. The oil needs time to seep into the corrosion layer and actually break the bond. If that cassette has been on the bike for more than a year, soak it longer. Just walk away.
Step 3: Position the chain whip correctly. Thread it through the cassette so it catches one of the larger cogs near the bottom of the cluster. Wrap it around the cassette body — not the freehub. The chain whip stops the cassette from spinning freely while you loosen the locknut. A slipping cassette will round your splines or snap your tool. Secure your grip on the handle before applying any force.
Step 4: Engage the lockring tool and turn left. This trips people up every single time. Left loosens. Right tightens. Left. Insert the lockring tool into the locknut splines firmly — it should seat without forcing. If it won’t seat smoothly, you have the wrong tool or a rounded spline. Apply steady counterclockwise pressure with your wrench. Short, firm motions. No jerking. The locknut breaking free usually produces a small pop or crack — that’s the corrosion layer giving way. Completely normal.
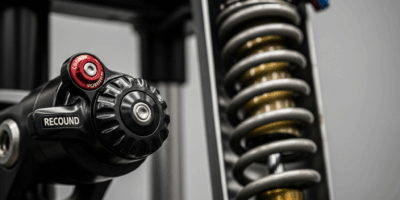
Step 5: If the hand method fails, move to the vise. Clamp the cassette body in a bench vise using two wood blocks to protect the cogs. Insert the lockring tool. Use the wrench for mechanical advantage. Still won’t budge? Apply heat with a heat gun — not a torch, that’s too aggressive — set to medium, aimed evenly around the freehub body. Wait 30 seconds. Try again. Repeat up to three times before escalating further.
Never use a screwdriver on the locknut splines. Ever. A screwdriver will slip and gouge the aluminum freehub body — and that damage is permanent.
Cassette Still Won’t Budge — Escalation Options
Frozen solid by alloy-on-alloy corrosion? That’s what makes this scenario so frustrating to us home mechanics — it looks like a normal stuck cassette right up until it doesn’t behave like one.
Heat is your tool. A heat gun set to medium, applied evenly around the freehub body for two to three minutes, expands the aluminum enough to sometimes break the corrosion bond. Let it cool for about 30 seconds — not fully, just slightly. Try sliding the cassette off by hand, using the chain whip for additional torque if needed. Repeat the heating cycle if it sticks again.
Three heating cycles and still nothing? Now you choose what to sacrifice: the cassette or the freehub. Cutting the cassette off with a fine-tooth hacksaw protects the freehub body. Go slowly. Work carefully. Once it’s off in pieces, soak the freehub body in penetrating oil for a full 24 hours, then scrub away the corrosion residue with a soft brush. A replacement cassette runs $40–$120 depending on your groupset. A replacement freehub body costs $80–$280. The math isn’t complicated.
Prevent It From Happening Again
Important part first.
Apply anti-seize grease to the locknut threads before reinstalling the cassette. Park Tool makes a good one — so does Shimano’s own product. A thin, even coat on the threads. Don’t glob it on. That single step alone prevents the vast majority of stuck cassettes.
I’m apparently a wet-weather rider and a steel freehub works for me while aluminum never survives more than two seasons before corrosion becomes a problem. If you ride in similar conditions — rain, coastal roads, winter salt — pair your cassette with a steel freehub body, or at minimum use anti-seize religiously every single reinstall. Avoid the galvanic corrosion scenario entirely rather than fighting it later.
Torque the locknut to spec: 40 Newton-meters for Shimano HG, 60 Nm for SRAM XD. A basic torque wrench is around $30. Worth every cent. Check the torque again after your first 10 rides — cassettes can settle slightly and come a little loose.
You fixed your own bike. That matters.


Stay in the loop
Get the latest pro bike tech updates delivered to your inbox.