“`html
What Cassette Slipping Actually Feels Like
I’ve been wrenching on bikes for about eight years now, and cassette slipping is the complaint that gets misdiagnosed more than almost any other drivetrain problem. People call it “jumping gears” or “skipping,” and they all mean slightly different things — which is why I’m starting here.
Cassette slipping isn’t the same as ghost shifting. Let me separate them. Ghost shifting happens when your derailleur moves the chain between sprockets without you touching the shifter — usually a cable tension or limit screw issue. That’s one problem. Cassette slipping is different. It feels like you’re in a gear, applying power, and suddenly the chain loses grip on the sprocket teeth and “pops” or “jumps” to an adjacent gear, then catches again. It happens mid-pedal stroke, usually under load or acceleration.
The sensation is distinct: you feel the drivetrain engage, then slip, then re-engage in rapid succession. Sometimes it’s violent enough that you nearly lose balance. Other times it’s just a subtle lurch that makes you lose cadence.
Some people describe it as the chain “bouncing” between two gears. That’s closer to what’s actually happening mechanically, honestly. The chain teeth aren’t meshing properly with the cassette sprocket teeth because either the chain is too stretched, the sprocket teeth are too worn, or both.
There’s also mid-gear slipping, which only happens in one or two specific sprockets. This is actually a diagnostic goldmine — it tells you the cassette teeth in those gears are probably hooked or flat, while others are fine. That pattern matters when deciding whether to replace the whole cassette or just accept the problem sprocket.
Diagnose Before You Fix — Check Chain Stretch First
Probably should have opened with this section, honestly. Most people skip diagnosis and jump straight to adjusting the derailleur or replacing the cassette. That’s expensive and usually wrong.
The first thing I do is measure chain stretch. A stretched chain is the #1 culprit in cassette slipping, and it’s often paired with a cassette that’s already worn. This is the mistake I made on my own road bike about three years ago — I replaced the cassette alone, rode for three weeks, and started slipping again because the chain was stretched to 0.8%. I had to replace everything.
Here’s the ruler method. You’ll need a steel ruler or a chain stretch tool — the Park Tool CC-3.2 runs about $25 and is worth it if you service bikes regularly. On a stretched chain, you measure from the center of one pin to the center of a pin exactly 12 links away. A new chain measures 12 inches exactly over that span. A chain stretched to 0.5% measures 12.06 inches. At 0.75% stretch, you’re at 12.09 inches.
If your chain measures 12.1 inches or more, it’s stretched beyond acceptable limits and needs replacement. No derailleur adjustment will fix slipping caused by a stretched chain. The teeth on your cassette are spaced to mesh with a chain of specific pitch. A stretched chain sits too low in the tooth valleys, loses contact, and slips.
Measuring with a ruler takes steadiness. Mark your starting pin with a marker, count 12 links forward, place the ruler’s zero mark at the first pin center, and read where the 12th pin center lands. Do this in three or four spots around the chain because wear isn’t always uniform. If any measurement reads over 0.75% stretch, the chain is your problem.
Here’s the critical part: a worn cassette and a stretched chain are a package deal. If you replace just the cassette and keep a 0.8% stretched chain, the new cassette teeth will be damaged by the stretched chain within weeks. The worn chain pulls the new sprocket teeth into the wrong angle. I’ve seen this happen three times to customers who ignored my advice and tried to save $40 on a chain.
Inspect Your Cassette for Wear Patterns
Once you’ve confirmed chain stretch isn’t the issue — or while you’re waiting for a replacement chain — inspect the cassette itself.
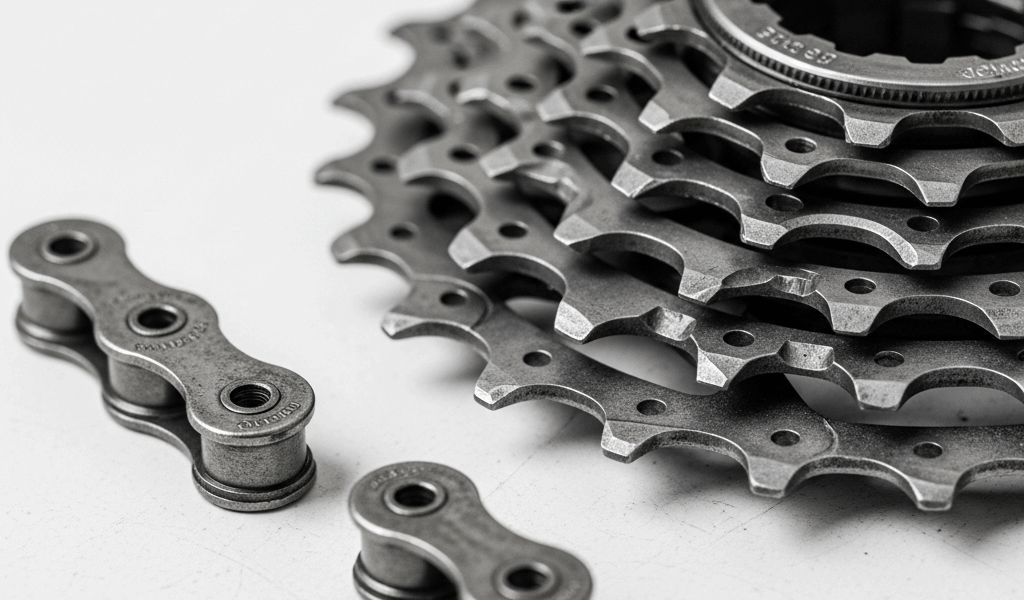
Worn cassette teeth have a distinctive “shark fin” shape. The leading edge of the tooth, the side the chain enters from, is sharp and hooked backward. A new tooth is symmetrical, almost triangular in profile. A worn tooth looks like a hook or crescent moon. You’ll see this most obviously on the smallest sprockets — the 11T, 12T, and 13T if you’re running a road cassette.
Grab a flashlight and get your head down level with the smallest sprocket. Look at the tooth profile from the side. Does the leading edge angle backward sharply? That’s wear. If the teeth look reasonably symmetrical, the cassette is likely fine and your problem is derailleur adjustment or cable tension.
Next, look for uneven wear across the cassette. A healthy cassette wears relatively evenly because you use all gears reasonably often. But some people have a “power band” — maybe they stay on the 15T and 16T sprockets 80% of the time. Those teeth will wear faster and hook more obviously. If only one or two sprockets show shark-fin teeth while others look fresh, you can sometimes live with it. You’ll slip in those gears but be fine everywhere else.
Look for polished spots versus dull spots on the tooth flanks, the sides of the teeth. Polished means the chain is dragging sideways across that area — a sign of misalignment or cable tension issues. Dull, worn-looking teeth with even wear patterns across the flank usually mean normal wear, not alignment problems.
Run your fingernail across the teeth. On a worn cassette, your nail will catch on the hooked leading edge. On a healthy cassette, your nail slides smoothly. This tactile test is faster than visual inspection once you’ve done it a few times.
Step-by-Step Fix — Adjust Derailleur B-Tension and Limit Screws
If your chain measures under 0.75% stretch and your cassette teeth aren’t visibly hooked, your problem is derailleur adjustment. This is actually good news because it’s free or costs only a few tools you probably own.
The B-tension screw — sometimes called the B-screw or angle-adjustment screw — controls how far the derailleur’s parallelogram cage sits from the cassette. If B-tension is too loose, the chain sits too close to the cassette and slips under load because there’s not enough chain wrap around the sprocket. Tighten B-tension by turning the screw clockwise. A quarter turn at a time. After each adjustment, stand over the bike, shift to your smallest cog, and apply moderate pedal pressure to see if slipping improves.
The limit screws — usually labeled H for high gear, small sprocket, and L for low gear, large sprocket — prevent the derailleur from moving the chain too far in either direction. If these are set too wide, the chain can slip off the cassette or sit between sprockets. Clockwise tightens the limit, counterclockwise loosens it. Find the screws on the derailleur body. They’re usually small Phillips or slot-head screws.
Here’s the sequence I use: First, shift to the smallest sprocket and adjust the H-limit screw so the derailleur is centered directly over that sprocket — not leaning in either direction. The chain should feel snug on that cog. Then shift to the largest sprocket and do the same with the L-limit screw. Finally, adjust cable tension. Pull on the derailleur cable with your hand and tighten the barrel adjuster, the threaded tube where cable enters the derailleur, to add tension or loosen it to reduce tension. Half-turn increments. The goal is smooth, quiet shifts with no chain rub.
Most slipping I fix with these adjustments alone takes about 15 minutes.
When to Replace Cassette vs. Adjust
Chain stretch over 0.75% means replacement. Full stop. Budget $40–80 for a decent cassette and $15–30 for a chain. Replacing both is the only permanent fix if you’re stretched past that threshold.
Visibly hooked cassette teeth, especially on multiple sprockets, mean replacement. Some people argue you can live with one worn sprocket. Maybe you can. But if three or four sprockets show shark fins, the drivetrain is compromised and a new cassette — not the whole groupset, just the cassette, $50–120 depending on gear count — will cost less than repeat adjustments and potential damage to a new chain.
If derailleur adjustment doesn’t eliminate slipping and your chain and cassette both measure healthy, you might have a bent derailleur hanger. This is rare but happens after impacts. A bent hanger will cause slipping even with perfect components. A bike shop can check this with a derailleur hanger alignment tool — usually a $10–20 service charge.
Here’s my rule: if you’ve confirmed chain stretch is under 0.75% and cassette teeth are reasonably symmetrical, spend 30 minutes adjusting the derailleur before spending money. Most slipping stops there. If adjustment doesn’t work, then you’re probably looking at replacement parts.
“`


Stay in the loop
Get the latest pro bike tech updates delivered to your inbox.