Why Creaks Are So Hard to Trace
Bottom bracket creaking has evolved with all the conflicting advice flying around. You’re pedaling along, minding your business, and there it is — a rhythmic pop or squeak that seems to come from everywhere and nowhere at the same time. The frustration isn’t just the noise itself. Sound bounces through your frame, seat tube, and chainstays like some kind of acoustic haunted house, making the actual source nearly impossible to identify by ear alone.
As someone who has spent an embarrassing three hours chasing a creak through two full component swaps, I taught myself the working side of this particular misery. Turned out my pedal axles were loose the whole time. The sound had traveled straight up through the crank and echoed through the downtube so convincingly I’d have sworn on a stack of Park Tool catalogs that the BB itself was disintegrating. Today, I will share it all with you — a systematic elimination process covering pedals, crank interface, BB shell, and frame — so you stop guessing and actually fix the thing on the first attempt.
Start Here — Rule Out Pedals and Cranks First
Before you even think about pulling your bottom bracket, rule out the two easiest culprits. Your pedals. Your crank bolts. Don’t skip this step.
Pedal Threads and Axle Play
Pedal creaks are responsible for probably 40% of all “BB creaks” that get diagnosed incorrectly every single day. The pedal axle threads into the crank arm, and over time those threads loosen or corrode. When you pedal hard — especially standing — you get flexion that creates a tiny amount of movement. That movement makes noise.
Start simple. Grab each pedal body and wiggle it. Does it move at all? That’s your answer right there. Remove both pedals using a 15mm wrench or your multi-tool — right pedal tightens clockwise, left pedal tightens counterclockwise, and I still have to think about this every single time without exception. Check the threads on the crank arm. Dirty? Corroded? Wipe them down with a dry cloth first. Apply a light coat of grease to the pedal threads — not so much it’s dripping everywhere — then thread the pedals back in. Torque to 35–40 Nm. Take it for a spin.
Still creaking? Swap your pedals for a cheap set of flat pedals temporarily. Something like a $15 pair of Wellgo platforms from the parts bin works fine here. Ride five minutes. Creak gone? You’ve isolated it to the pedals or the crank’s pedal threads. Creak still there? Move on.
Crank Arm Bolts
This is the second easiest fix. And it solves real problems more often than people expect. Crank bolts loosen — they just do. When they’re loose, the crank arm rocks slightly on the spindle with each pedal stroke, creating friction and noise that sounds exactly like a bottom bracket creak. Maddening.
You need a torque wrench and the correct hex key for your specific crank system. Shimano HollowTech II cranks use a 5mm key and torque to 12 Nm. SRAM DUB cranks use an 8mm key at 14 Nm. FSA cranks typically run 10 Nm with a 4mm key. Check your crank’s manual if you’re unsure — don’t just guess. Remove both bolts, clean the threads and bolt heads with a dry cloth, reinstall with fresh torque. Use an actual torque wrench here. Not a feeling. Not a guess.
Here’s the diagnostic trick worth remembering: stand up and pedal hard for 30 seconds, then sit and pedal easy for another 30. Creak only happens standing? Almost certainly loose crank bolts or pedal threads. Creak happens seated at any cadence? That’s more likely the BB itself telling you something.
How to Inspect and Service the Bottom Bracket
Assuming pedals and cranks are tight, you’re actually dealing with the BB now. But what is a bottom bracket inspection, really? In essence, it’s checking for contamination, wear, and interface problems before you spend money replacing something that might just need cleaning. But it’s much more than that — the approach changes completely depending on which standard your frame uses.
Threaded Bottom Brackets
Older frames and many steel bikes still use threaded BBs — the kind that screw into the frame like a cartridge. These are honestly my favorite standard. Creaking here usually comes from contamination or dry threads.
Remove the crank. Unscrew the BB using the correct tool — usually a pin spanner or notched cup tool. Once it’s out, look inside the BB shell. Dirt? Grit? That’s your culprit. Wipe the shell interior with a degreaser on a clean rag, then apply a fresh coat of marine grease — I use Shimano’s own grease in the blue tub, roughly $10 at any shop. Re-thread the BB and torque it to 50 Nm for most systems. Reinstall the crank and test.
Still creaking after greasing? The bearing itself is probably shot. That’s when you replace it — not before. A new threaded BB runs $20–$60 depending on quality. Buy once, buy decent. Skip past the mistake I made of buying the $14 Nashbar unit twice in one season.
Press-Fit Bottom Brackets (PF30, BB86, BB92)
Press-fit BBs are pressed directly into the frame shell. No threads. That’s what makes the design efficient — and also what makes it so noise-prone. Cups have nothing threading against them to dampen vibration, so any play between cup and shell, or any contamination at the interface, becomes an annoying creak almost immediately.
Flip the bike upside down. Spin the cranks by hand. Does the crankset rotate smoothly, or is there grinding? Grinding means the bearings are damaged — replacement only. Smooth rotation that creaks under load points to contamination or play at the interface, which is sometimes fixable without buying anything.
Worth flagging before going further. PF creaking is so common that shops see it every single week. The real problem is that many frame manufacturers don’t spend enough time prepping the shell during production, so contamination gets trapped from day one. If this is happening on a brand new bike — especially anything under $2,500 from a big-box brand — take it back to the shop immediately. That’s on them.
If you’re trying to save the BB yourself, remove the crankset, use a rubber mallet and a small wooden block to tap the crank free, then inspect the cups for debris. If the cups are removable — some cartridge-style PF BBs are, others definitely aren’t — pull them, clean the shell thoroughly with rubbing alcohol and a lint-free cloth, and reinstall with a thin layer of anti-creak compound. Silca and Park Tool both make versions specifically for this application. Reinstall everything and test.
If the cups are scored or the shell is out of tolerance, replacement becomes cheaper than continued diagnosis. A quality PF BB like the Wheels Manufacturing angular contact unit runs around $85 — worth it on a bike you actually ride hard.
T47 Bottom Brackets
T47 is a hybrid standard — threaded outside, press-fit inside. That’s what makes T47 endearing to us frame nerds who’ve been burned by PF30 one too many times. It’s become popular on higher-end frames because it’s quieter than pure press-fit and more serviceable than anything that gets hammered in with a mallet.
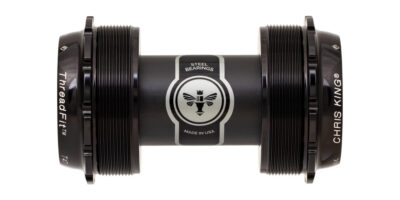
Remove the crank and unscrew the BB using a standard 50mm cup tool. Inspect the shell the same way you would with any threaded standard. Grease the threads and the inside of the shell with marine grease, reinstall, and torque to 50 Nm. Still creaking? Bearing wear or internal contamination. Replace the cartridge. A good T47 unit from Chris King runs about $200 — yes, really — but the CeramicSpeed option at $260 is also genuinely worth considering if you ride more than 8,000 miles per year.
Frame and Interface Issues That Mimic BB Creak
Sometimes the creak isn’t the BB. It’s the frame itself — and that changes everything about how you approach the fix.
Carbon Frame Flex
Carbon frames around press-fit shells flex under load. That flex creates microscopic movement between cup and shell, and movement creates noise. You’ll notice it mostly during hard standing efforts or sprints. The creak disappears entirely when you sit and spin easy. That pattern is the tell.
This is a frame design issue, not a component issue. So, without further ado, let’s dive into your actual options: try an anti-creak sleeve first — Chris King makes aluminum sleeves designed to fit inside PF shells and reduce play significantly. Apply Loctite 243 around the cup before installation if you want something reversible that also dampens vibration. Or, go nuclear and have a machine shop install a threaded insert to convert the frame to a T47 or BSA threaded standard. The conversion runs $150–$300 in labor depending on your area, but it solves the problem permanently on a bike you plan to keep riding for years.
Full-Suspension Pivot Creaks
Frustrated by what seemed like an obvious BB creak, I once pulled my entire bottom bracket on a Trek Fuel EX only to find the rear chainstay pivot had been loose the whole time. That was 2019. Cost me four hours and a $45 BB I didn’t need.
On full-suspension mountain bikes, rear pivot creaks during pedaling can sound almost identical to BB creak — they’re just different enough to be confusing. Check every pivot bolt on the bike. Torque them to spec using your frame’s manual. Apply a light grease to any dry-looking pivot hardware. This new pivot-first habit took hold several years later and eventually evolved into the diagnostic routine I now follow every time a creak appears on a full-squish bike.
Seat Tube Contamination
Dirt between the seat tube and BB shell can cause a creak that mirrors BB noise almost perfectly. Rare, but real. If you’ve eliminated everything else, remove the seatpost and inspect the inside of the seat tube around the BB shell area. Clean and grease if needed. Takes ten minutes. Worth checking before you spend more money.
Still Creaking — What to Check Next
The Quick Checklist
- Tighten the headset — loosen stem bolts, tap the stem cap down gently to remove play, retighten. A loose headset creaks on nearly every pedal stroke and fools a lot of people.
- Check saddle rails. Clamp the saddle rail lightly, apply pedal pressure, and wiggle. Rail creaks don’t happen often but they absolutely happen. I’m apparently more susceptible to this than most riders and a Fizik Arione works for me while my old WTB saddle never stopped creaking despite two replacements.
- Inspect the stem and handlebar interface. Apply a thin layer of grease to the stem clamp and bar contact area, retorque to spec — typically 4–6 Nm on carbon bars, 6–8 Nm on aluminum.
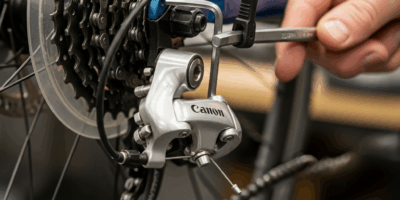
- Listen to the drivetrain carefully. Shift through every gear combination while standing and pedaling hard. A creak that only appears in certain gears is almost always a chain, cassette, or derailleur alignment issue — not the BB. Steer clear of where I went wrong of replacing a perfectly good bottom bracket when the real problem was a worn 11-speed chain.
When to Take It to a Shop
While you won’t need a full professional overhaul for most creak situations, you will need a handful of specific tools — a torque wrench, proper BB tools, and the right greases — to do this correctly at home. First, you should work through every step above systematically — at least if you want to avoid paying diagnostic labor fees on top of parts costs.
A good shop might be the best option, as persistent frame creaks require equipment and experience that most home mechanics simply don’t have. That is because cracked BB shells and out-of-tolerance press-fit bores aren’t visible to the naked eye — shops have measuring tools and experience spotting these failures before they become catastrophic.
One last thing worth saying honestly: sometimes a frame is just noisy. Some carbon layup designs transmit sound in ways that steel and aluminum simply don’t. If a shop confirms your BB, frame, and all interfaces are clean, properly greased, and torqued correctly — and the creak still persists — you might be living with a frame characteristic rather than a fixable defect. That’s not the answer anyone wants to hear. But it’s better than throwing another $200 in parts at something that was never going to change.


Stay in the loop
Get the latest pro bike tech updates delivered to your inbox.