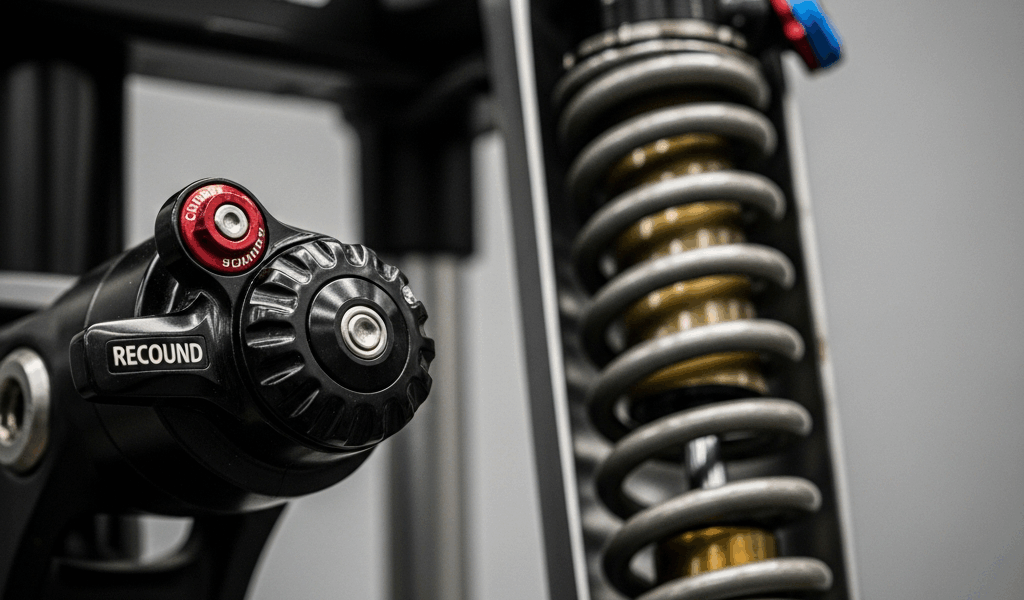
If a rear shock is not rebounding properly, first determine whether it returns too slowly, returns too quickly, or remains partly compressed. Record the current settings, identify the exact shock model and year, open any climb or lockout control for testing, verify air pressure and sag using the bicycle and shock manuals, and change rebound only one or two clicks at a time. If the shock leaks, is damaged, stays stuck down, tops out harshly, or the rebound adjuster has no effect across its usable range, stop riding and arrange qualified service.
Do not loosen a bleed screw or open a damper to “release trapped air.” Rear-shock dampers can be highly pressurized. A RockShox service manual warns that removing a bleed screw while the shock is pressurized can eject oil forcefully, and current damper procedures can require pressures far beyond a normal air-spring setup. Internal work belongs to the exact service manual and a trained technician with the specified tools and safety equipment.
Rear-shock rebound symptom guide
| What you feel or see | Likely category | Safe first check |
|---|---|---|
| Shock remains lower after repeated bumps; travel feels progressively reduced | Too much rebound damping, incorrect spring setup, or service problem | Check the manual baseline, air pressure/sag, and compression control; speed rebound up one click at a time |
| Rear wheel skips, bike feels bouncy, or saddle kicks upward after impacts | Too little rebound damping or spring pressure/setup mismatch | Check sag first, then add one click of rebound damping at a time |
| Shock stays partly compressed while unloaded | Air-chamber imbalance, mechanical binding, or internal fault | Stop riding; follow the exact manufacturer’s stuck-down procedure or use a service center |
| Knob turns but behavior does not change | Wrong control, insufficient test, detached/damaged adjuster, or internal damper fault | Identify the control from the manual, record the full click range without forcing it, and compare settings in a repeatable test |
| Visible oil, scored shaft, loose mount, clunk, or sudden new behavior | Damage, wear, or service issue | Do not ride; have the shock and frame hardware inspected |
Before adjusting anything: identify the shock
“FOX DPS,” “FOX RP23,” “RockShox Deluxe,” and “rear air shock” are not precise enough for every procedure. Find the model, model year, serial number or four-digit FOX ID, stroke, and bicycle model. Rear shocks can have bike-specific tunes, travel limits, remote controls, and mounting hardware.
Use both sources:
- The bicycle manufacturer’s setup chart for the frame’s recommended sag, pressure starting point, and shock tune.
- The shock manufacturer’s manual for control direction, click-count convention, pressure limit, equalization procedure, and service instructions.
FOX warns that rear-shock setup and configuration vary greatly among bicycle manufacturers. RockShox likewise directs riders to identify the product and use model-specific starting settings, including the TrailHead app for supported products.
Step 1: stop for damage or a safety-critical symptom
Do not continue testing on trail if you find:
- oil running from the damper or air-sleeve area;
- a scratched, pitted, bent, or corroded shaft;
- a cracked shock body, eyelet, linkage, or frame mount;
- loose or missing mounting hardware;
- a harsh metal top-out or bottom-out clunk;
- a shock that stays compressed after the bike is unloaded;
- a sudden loss of damping after an impact;
- frame, tire, or linkage contact that was not present before.
Clean only enough to inspect the exterior. FOX recommends mild soap and water followed by a soft-rag wipe, and warns against solvents, degreasers, pressure washing, or directing spray at the seal junction. Do not apply a generic spray lubricant to the shaft unless the exact manufacturer instructions call for it; products can attract contamination or be incompatible with seals and finishes.
Step 2: put the shock in its normal test mode
Open the compression, climb, threshold, or lockout control as directed by the manual. A firm climbing mode can make the rear suspension feel reluctant to move and can confuse a rebound test. Electronic and remote-controlled systems may require additional checks.
Confirm that tire pressure is reasonable, the wheel moves freely, and nothing is binding in the suspension or frame. A stiff pivot, damaged bearing, overtightened hardware, or brake contact can imitate poor suspension response. Do not loosen frame pivots or shock hardware without the bicycle manufacturer’s torque procedure.
Step 3: record the existing rebound setting
Take a photo and write down the current position before changing it. Turn the rebound adjuster gently toward the manual’s closed or slow direction while counting distinct clicks. Stop when it reaches its normal stop—never force the knob. Return it to the recorded position.
On many FOX and RockShox shocks, clockwise adds rebound damping and slows extension, while counterclockwise removes damping and speeds extension. Confirm this for the exact model. RockShox commonly expresses a starting setting as clicks from the fully closed, slowest position; a random “middle of the dial” is not a universal baseline.
Step 4: verify spring pressure and sag first
Rebound setting depends on spring force. Higher air pressure or a stiffer coil stores more energy and generally needs a different damping setting. If spring pressure changed, the previous rebound setting may no longer be appropriate.
For an air shock:
- Use a high-pressure shock pump, not a tire-floor pump or compressor.
- Check the shock and frame pressure limits before adding air.
- Set the compression control to the manual’s open position.
- Equalize positive and negative air chambers exactly as the manual specifies while approaching the target pressure.
- Measure sag with normal riding equipment and body position.
- Use the bicycle maker’s target where available; do not apply one percentage to every frame and discipline.
As examples rather than universal rules, FOX’s 2024 FLOAT guide recommends 25–30% sag for that shock family, while RockShox tells riders to use product-specific starting pressure and rebound suggestions. The frame manufacturer’s recommendation can be more specific to the suspension design.
Step 5: make one controlled rebound change
Use a safe, repeatable section of trail or a controlled parking-lot test—not a high-speed descent or large jump. Change only rebound, one click at a time, and repeat the same test.
- If the shock packs down or fails to recover between repeated bumps: remove a small amount of rebound damping to let it extend faster.
- If the rear feels springy, kicks, or loses ground contact: add a small amount of rebound damping to slow extension.
RockShox’s current fine-tuning guide recommends changes of one or two clicks at a time. The goal is controlled extension that restores travel and maintains tire contact—not the fastest or slowest possible setting.
What if the rebound knob does nothing?
First make sure you are turning the rebound control rather than compression, threshold, or another adjuster. Confirm that the knob produces distinct clicks or movement appropriate to the model. Compare two meaningfully separated settings in the same low-risk test, while keeping pressure, sag, tires, and compression mode constant.
If behavior remains identical from the manufacturer’s usable slow setting to its usable fast setting, or if the adjuster is loose, spins abnormally, binds, or has no normal stops, discontinue riding. An adjuster mechanism or damper may require service. Continuing to turn or disassemble it can cause more damage.
FOX RP23 rebound not working
The FOX FLOAT RP23 is an older air shock, so identify its exact year and tune before ordering parts or following a video. The FOX RP23 owner’s manual describes a red rebound knob with approximately 8–10 clicks. For that model, clockwise slows rebound and counterclockwise speeds it up.
- Put ProPedal in the manual’s normal open test position.
- Check for exterior damage, oil, abnormal shaft wear, loose mounting hardware, or a stuck-down condition.
- Verify sag and air pressure using the frame and correct-year RP23 instructions.
- Record the knob position and confirm that it moves through normal clicks without force.
- Compare one or two clicks slower and faster in the same controlled test.
If the RP23 still shows no damping change, has harsh top-out, leaks, or remains compressed, it needs professional evaluation. FOX’s RP23 documentation directs internal service to FOX or an authorized service center.
A stuck-down shock is not a normal rebound setting
An air shock that remains shortened while unloaded may have unequal pressure between air chambers or an internal problem. Do not pull the air sleeve apart while pressure may remain trapped. Some FOX manuals describe a model-specific process involving adding air and slowly cycling the shock to restore chamber balance, but that procedure must match the exact shock and must stay within its pressure limit.
If the model cannot be identified, the shaft will not extend, or the documented procedure does not resolve it, use an authorized service center. Treating a stuck-down condition as a simple “turn the rebound faster” problem can be dangerous.
Do not open the damper or bleed screw
The air spring pressure available at the external Schrader valve is not the only pressure in a rear shock. Internal floating-piston and damper systems can retain much higher pressure. Current RockShox service procedures can require special high-pressure pumps, nitrogen or air charging, vise blocks, oils, bleed tools, and precise measurements.
A RockShox Super Deluxe service manual explicitly warns that removing the damper bleed screw while pressurized can forcefully eject oil. That is why this guide stops at external inspection, setup, and adjustment. A generic video or service kit does not make an internal procedure safe for an unidentified shock.
When professional service is the correct fix
Arrange service when:
- the rebound adjuster has no measurable effect after setup is verified;
- the shock leaks oil or repeatedly loses air;
- extension is not smooth, consistent, or full;
- the shock has a scored shaft, damaged body, loose eyelet, or abnormal noise;
- the bike has crashed or the problem appeared suddenly;
- the manufacturer’s service interval has been reached;
- the required procedure opens the air sleeve, damper, reservoir, or bleed port and you lack the exact manual, tools, and training.
Service intervals are model- and procedure-specific. Do not rely on one “50–100 hour” rule for every FOX, RockShox, Cane Creek, Öhlins, DVO, Marzocchi, or other shock. Look up the serial number or model-year manual and distinguish routine exterior care, air-sleeve service, and full damper service.
Bottom line
Diagnose a rear shock in this order: identify the exact product, stop for damage, open the compression control, verify spring pressure and sag, record the current rebound setting, and test one-click changes safely. Slow packing needs faster return; kickback needs more rebound damping. A stuck-down shock, leak, damaged part, harsh top-out, or adjuster with no effect requires model-specific service—not a loosened bleed screw.
If another component is failing to extend rather than the suspension itself, use our guide to a dropper post that will not return. For noises that can be confused with suspension movement, see how to isolate a creaking headset or a bottom bracket that creaks under load.
Manufacturer sources
- RockShox Suspension Welcome Guide
- RockShox Suspension Fine Tuning
- FOX 2025 FLOAT shock owner’s manual
- FOX FLOAT RP23 owner’s manual
- RockShox Super Deluxe service manual and pressure warnings
Setup and safety references checked August 2026. Always follow the exact bicycle and shock manufacturer instructions for your model and year.


Stay in the loop
Get the latest pro bike tech updates delivered to your inbox.