Why Your Chain Skips and What It Actually Means
Chain skipping under load stops you mid-ride and makes every pedal stroke feel dangerous. You’re climbing, putting power down, and suddenly your chain jumps a tooth or two on the cassette — the bike lurches forward unpredictably. Most riders immediately assume the chain is shot and order a replacement. I did exactly that once. Spent $60 on a new chain, installed it, and the skipping continued. Turned out my cassette had teeth worn into hook shapes that no fresh chain could grip properly.
Chain skipping under load happens for three specific reasons, and diagnosing which one is causing your problem will save you from replacing parts you don’t actually need to replace. Ghost shifting — where the chain seems to jump gears on its own without you touching the shifter — is different from chain skip. Ghost shifting usually means derailleur cable tension or alignment issues. But chain skip? That’s the chain actually losing grip under pedal pressure and slipping forward on the cassette sprocket.
Here’s the scenario that probably brought you here: You’re in the middle ring, third or fourth cog from the bottom, really putting pressure on the pedals. The chain skips. You back off, it stops. You hit it hard again, it skips again. This happens on certain cogs but not others. That specific behavior tells you something important about what’s actually worn out.
Check Your Chain Wear First (The $20 Diagnosis)
The chain wear measurement is where most DIY diagnosis falls apart. People guess. They eyeball the chain and think “yeah, that looks stretched.” Then they buy a new one and feel foolish when it still skips.
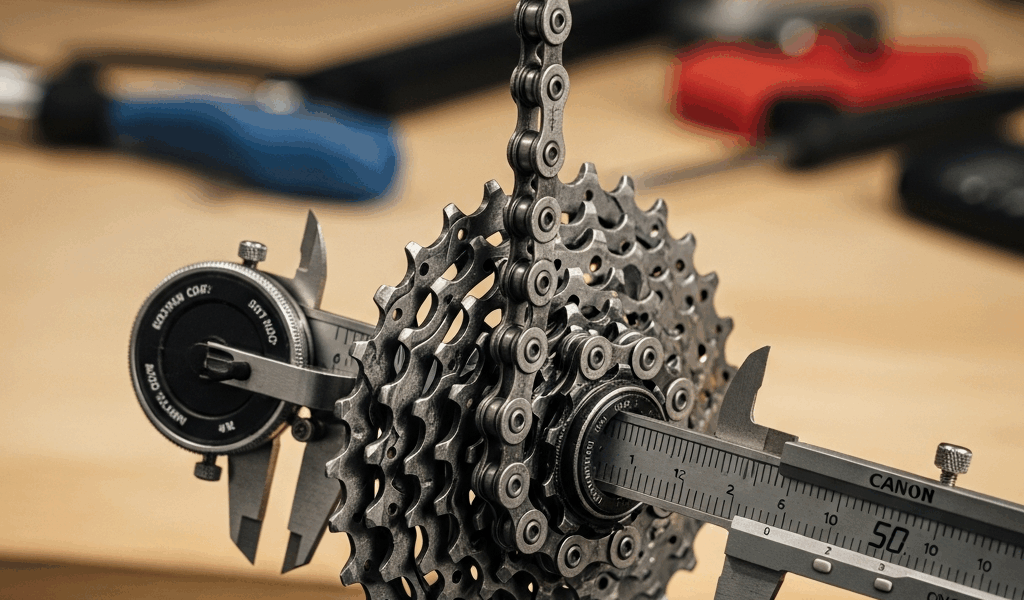
You need a chain checker tool — Park Tool makes the CC-3.2 for about $15. It has two sides. One measures 0.75-inch wear, the other measures 1.0-inch wear. A chain is considered “worn” when it measures 0.75 inches of stretch. It’s “very worn” at 1.0 inches. Most modern chains start skipping around the 0.75 mark, especially on worn cassettes.
Don’t have a chain checker? Use a ruler instead. On a chain with the master link removed or on a section where you can measure, count exactly 24 links from the center of one pin to the center of another pin 24 links away. A new chain measures 12.00 inches exactly across those 24 links. Stretched to 12.09 inches? That’s 0.75-inch wear. At 12.19 inches, it’s very worn. A cheap ruler works fine for this.
Why does a worn chain skip on a fresh cassette? The pins and rollers on your worn chain have actually stretched apart — the distance between pins increases. A new cassette has teeth designed for chain pitch of exactly 12.00 inches. When your chain measures 12.10 inches, those stretched links don’t seat properly in the tooth valleys. Under load, when you’re pushing hard, the chain can’t maintain engagement and slips forward.
Write down your measurement. If your chain measures 12.00 to 12.08 inches, the chain isn’t your problem — move to the cassette check. If it measures 12.09 inches or more, your chain is worn and needs replacement before you waste time on other diagnostics.
Inspect Cassette Teeth for Shark Fins and Wear Patterns
Cassette wear shows up as specific tooth shapes. Imagine looking at a cassette from the side — new teeth are relatively symmetrical and slightly rounded. Worn teeth look like shark fins. The front edge slopes down steeply, then there’s a sharp hook at the back edge. This hooked shape happens because the chain wears into the tooth. When teeth develop those hooks, they’ll skip even with a brand new chain because the chain can’t grip the hook.
The single tooth test is the fastest visual check. Spin the cassette slowly by hand and look at the teeth across the cassette. Maybe one or two teeth with slight wear? You’re probably fine. Half the teeth on your most-used cogs look hooked, or adjacent teeth show visible height differences? The cassette is worn.
Mid-range cogs wear first because that’s where you spend 70% of your time. On a 10-speed road cassette, cogs 4 through 7 — the middle — wear fastest. On a mountain bike 9-speed, cogs 3 through 6 wear first. You’ll often see the smallest, most-used cogs have severe wear while the large cogs still look nearly new.
Removed the cassette yet? Lean it against a work light and look along the tooth edge at an angle. Severely worn teeth will look like they’re leaning backward relative to newer teeth — that lean is the hook. A chain will slip off that hook under load.
Write down whether your cassette shows wear. If only one or two cogs have hooks and the rest are fine, you might get away with replacing just that cog if it’s a removable design. Most modern cassettes are riveted together, so you’re replacing the whole thing ($40–$120 depending on quality).
Rule Out Derailleur Position and Cable Tension
Probably should have opened with this section, honestly. Derailleur issues can absolutely cause chain skip even on fresh components. The derailleur’s job is to keep the chain positioned correctly over each cog. When the derailleur is misaligned or the cable tension is wrong, the chain doesn’t sit fully in the tooth valley — it’s only half-engaged. Then under load, it skips.
Start with the B-screw. This adjustment controls how far the derailleur cage sits from the cassette. Most derailleurs have 2–3mm of clearance between the cage and the cassette. If your B-screw is turned too far in, the cage is too close and pushes the chain, causing lateral pressure that breaks the grip. Too far out? The chain can’t find the cog properly.
The right B-screw position: Shift to the smallest cog. The derailleur cage should be about 2–3mm away from the cassette. You can use a feeler gauge or just eyeball it against a ruler held nearby — one quarter turn of the B-screw changes clearance by roughly 0.5mm. Make small adjustments.
Next, cable slack. The cable that runs from your shifter to the derailleur needs tension. If it’s too slack, the derailleur can’t pull the chain back toward smaller cogs under load. You’ll feel the chain skip when you’re pedaling hard in the lower gears because the cable can’t maintain position. Check this by shifting up to a larger cog, then hard down to a smaller one. If the shift is sluggish going down, the cable likely has slack. The barrel adjuster on the cable outer housing can fine-tune this.
Finally, rear derailleur hanger alignment. The hanger is the small arm that holds the derailleur body — if it’s bent, even slightly, the derailleur won’t sit in its intended position. Bent by 2–3mm from a crash or sloppy repair, and suddenly your chain skip problem appears on every cog. Check alignment by shifting to the middle of the cassette and looking at the derailleur from directly behind the bike. The derailleur cage should be parallel to the cassette. If it looks tilted, your hanger is bent and needs straightening (or replacement if severely bent). A specialized hanger alignment tool like the Park Tool DAG-2.2 ($60) does this correctly — without it, you risk bending the hanger worse.
Decision Tree: Replace, Adjust, or Both
You’ve now done three diagnostic checks. Here’s the decision logic:
- Chain 12.00–12.08 inches AND cassette teeth look normal AND derailleur aligned: The problem isn’t wear or misalignment. Check your cable tension. Make small barrel adjuster turns — quarter turns, test after each. If skipping continues, you may have a bent hanger. Straighten or replace it.
- Chain 12.09+ inches AND cassette teeth look fine AND derailleur aligned: Replace the chain only. Cost: $30–$60 depending on speed. This is your situation if you caught the wear early.
- Chain looks fine OR barely worn AND cassette teeth show hooks: Replace the cassette. If your chain is under 12.08 inches, you can sometimes reuse it on the fresh cassette. But if your chain measured 12.05+ inches, pair it with a new cassette anyway because a slightly stretched chain on a fresh cassette still skips. Cost: $40–$120 for cassette.
- Chain 12.09+ inches AND cassette teeth hooked: Replace both. You’ve worn them together. A new chain alone will skip on hooked teeth. A new cassette alone will wear out fast with a stretched chain. Cost: $70–$180 for the pair. This scenario happens when people ignore chain maintenance for years.
- Chain and cassette fine but derailleur hanger bent: Straighten or replace the hanger ($15–$60). You don’t need new drivetrain parts here.
The cost reality: Diagnosing correctly saves $30–$80 on unnecessary part replacement. A chain checker tool costs $15 one time and pays for itself immediately. That’s why this diagnosis matters.


Stay in the loop
Get the latest pro bike tech updates delivered to your inbox.