“`html
Why Your Rear Derailleur Cage Hits Your Spokes
I’ve been cycling seriously for about twelve years now, and honestly—that rear derailleur cage hitting spokes remains one of the most panic-inducing mechanical issues a rider can encounter. That grinding sound. The sudden sense that something’s about to catastrophically fail. But here’s the thing I’ve learned through trial and error: that problem usually isn’t a catastrophe waiting to happen. It’s your bike telling you exactly what’s wrong through one of three very specific culprits.
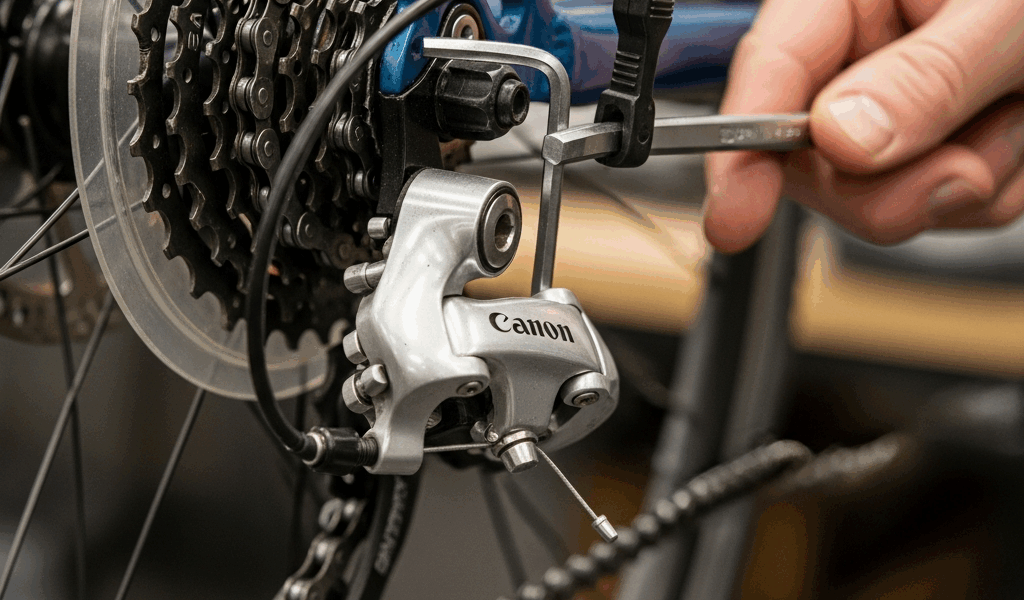
The cage itself is a simple mechanical piece—it guides your chain up and down the cassette cogs using two small pulleys and a stamped-steel or aluminum frame. When something goes wrong, the cage either moves inward toward the wheel hub (where the spokes live) or gets positioned at the wrong angle. The three root causes break down cleanly once you know what to look for.
Cable tension is the most common problem—probably should have opened with this section, honestly. Think of the cable like a taut rope pulling your derailleur inward. Tighten that rope too much, and the derailleur body gets pulled toward the spokes. The direction you’d never want it to go. This happens gradually over time as cables stretch, and it’s almost always fixable in five minutes without tools.
A bent or misaligned derailleur hanger is the second cause. Your hanger is a small metal bracket bolted to the rear dropout of your frame—a precision component that’s designed to sit perfectly parallel to your wheel, positioning the derailleur cage at exactly the right distance from your spokes. When it bends (from a crash, a careless lean against a wall, or shipping damage), that geometry shifts. The cage drifts inward.
The third culprit is the cage itself. Aluminum and steel deform. Impact, corrosion, or just the metal fatigue from thousands of shifts can bend the cage or wear out its internal walls where the pulleys sit. Once that happens, no cable adjustment will save you.
Check Cable Tension First — This Takes 5 Minutes
Start here. I’ve watched countless riders skip this step and spend money on a new derailleur when a $0 adjustment would’ve solved the problem.
Shift your chain to the smallest cog on the cassette—the highest gear. This move is critical because it moves the derailleur cage into its most inboard position, closest to the spokes. If tension is your problem, this is where you’ll see the contact happening. Position yourself where you can see the derailleur from behind, watching the gap between the cage and the nearest spoke. You should see clear daylight. At least a quarter-inch is comfortable; a sixteenth is pushing it.
Now look at the actual derailleur body. The cage should sit at a slight inward angle—roughly 5–10 degrees—pointing away from the wheel. If it’s perpendicular to the ground or tilted toward the spokes, you’ve likely got a hanger problem or a cage issue. But first, let’s assume cable tension is the culprit and test it.
Locate the barrel adjuster on the derailleur. On most bikes, it’s a small cylinder where the cable enters the derailleur body. Loosen it by turning counterclockwise—half a turn at a time. Only. Half. Turns. Don’t make my mistake after over-adjusting and watching my cable go slack.
After each adjustment, shift up to the smallest cog again and observe that gap. You’re looking for the moment the cage stops touching the spokes. That’s your sweet spot. Usually, this takes two to four half-turns.
If the cage clears the spokes after you’ve loosened the barrel adjuster slightly, you just fixed your bike. Cable tension was your issue. Document this setting by remembering roughly how many turns you made, or use a marker to note the barrel position on the cable housing.
If loosening the cable makes no difference—if the cage still contacts spokes even with the cable totally slack—move to the next diagnosis. The hanger or cage is your real problem.
Test Your Derailleur Hanger Alignment
Here’s where diagnosis gets more involved. A bent hanger is common enough that professional bike shops keep hanger-alignment tools on hand, but the DIY check method works fine for identifying the problem.
Shift your chain to the middle of the cassette. Look at the derailleur from directly behind the bike, standing so your eye is level with the cassette. A perfectly aligned derailleur cage should sit parallel to the plane of the cassette cogs—imagine the cage edges and the cog teeth all pointing in the same direction. If the cage tilts inward or outward, or if the angle looks off, your hanger is bent.
You can also use a straight edge. Grab a long ruler or a length of straight metal (I’ve used a bike tire lever in a pinch). Hold it against the derailleur hanger—the part bolted to the frame. Look for gaps between the straight edge and the hanger body. Any visible daylight means misalignment.
Here’s the reality check: if your hanger is visibly warped—if it looks like it’s been hit—DIY correction is risky. Modern hangers are precision-engineered. Bending them back with pliers or a hammer usually creates new problems. A derailleur hanger tool costs around $20–30 if you own one, but a professional alignment at a shop runs $15–40 depending on location. That’s cheap insurance against damaging your frame or derailleur further.
But hangers do shift slightly without visible damage. If your hanger looks straight and your cable was already loose, move to the next section.
Inspect the Derailleur Cage for Wear or Damage
A worn or bent cage is the hardest problem to spot without close inspection—and it’s also the one that requires replacement rather than adjustment.
Remove your derailleur (or just peer at it closely). Look at the cage pulleys. Spin them by hand. They should turn freely and smoothly. If they’re stuck, grinding, or pitted, the cage is likely worn. The two metal plates that form the cage body should be parallel, straight, and symmetrical. Any visible bending, cracking, or deformation means replacement is necessary.
Aluminum cages are lighter but dent easily. Steel cages are tougher but heavier. If you’ve hit a pothole hard, crashed into something, or haven’t replaced your derailleur in eight or nine years, cage wear becomes plausible.
Here’s the cost math: a mid-range derailleur replacement—cables, installation, adjustment—runs $80–200 at a shop, or $40–120 if you source the part yourself and have some mechanical skill. A bent rim from spoke damage costs $150–400 to true or replace. Protecting your wheel is worth the derailleur upgrade. I learned this after waiting too long on a worn cage and eventually riding into an expensive spoke problem.
If the cage looks physically intact, the pulleys spin freely, and your cable tension is already loose, your hanger is almost certainly bent. Proceed with professional alignment.
When to Stop and Visit a Mechanic
Not every problem deserves a DIY fix. These three scenarios demand professional help:
- Your hanger is visibly bent or crushed. Hangers survive minor dings, but if the metal is clearly warped—dented inward, twisted, or folded—a hanger-alignment tool can correct it, but only if the frame itself isn’t damaged. A mechanic can assess whether realignment is safe or if replacement is needed.
- Your cage has a crack or obvious bend. A cracked cage can fail completely, leaving your chain free to climb into your spokes or jam between the cassette and frame. Replacement is mandatory.
- You’ve loosened the cable completely and the cage still hits spokes. This confirms the problem isn’t cable tension. Your hanger, cage, or something more fundamental (frame dropout damage, for instance) is at fault. A mechanic’s eyes and tools will save you time and potential damage.
One more scenario worth mentioning: if you’re in doubt, the cost of a 15-minute professional diagnosis is nothing compared to a bent rim or a failed shift at the wrong moment. I spent years thinking I was saving money by avoiding mechanics, and I wasted far more on parts damaged by ignored warnings.
Rear derailleur issues feel serious because the sound and motion are alarming. But the fix usually matches the cause exactly: a cable adjustment, a hanger realignment, or a component replacement. Diagnose first, then act. Your spokes will thank you.
“`


Stay in the loop
Get the latest pro bike tech updates delivered to your inbox.